Saturday, January 5, 2008
My own Tutorial - XXL Mens Shirt into a dress
20% off pet costumes with code PETCOSTUMES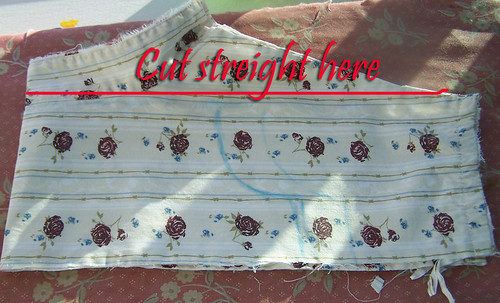
Now I couldnt not have done this dress with a smaller shirt. (if you havnt seen it yet I got this Idea from this Tutorial)
Useing this shirt I was able to gather a skirt and make it nice and flowy.
We start like the old tutorial. BUt I just cut the top bit off. I didnt do it all in one piece like the other tutorial did so that i could gather the skirt. I also cut it to size after cutting this top part. so I was sure I had enough fabric. this is the skirt. If you know how to sew you should know how to do a basting stitch. then just gather the faric to the same size as the top.... (what ever size your top is I use one of my daughters other dresses to size it.) I dont really have sizes for you but I would say the skirt before gathering is about double the size of the top
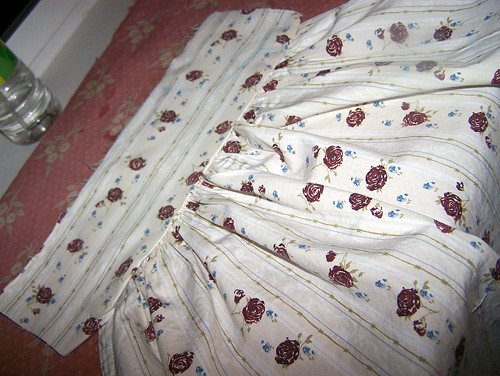
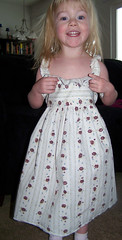
I then put the top right side to right side with the gathered skirt and sewed together I used my serger so it was strong. I then turned it right side out and pressed it > that is what it looks like after a pressing. I then folded it in half and put it over the button part to make sure I had 2 sides about the same size I made the skirt part on my back a bit bigger so it would still be flowy.I added a 1/4th inch elastic to the back ( in two pieces) for a gathering effect and a better fit
Here I sewed it together and found it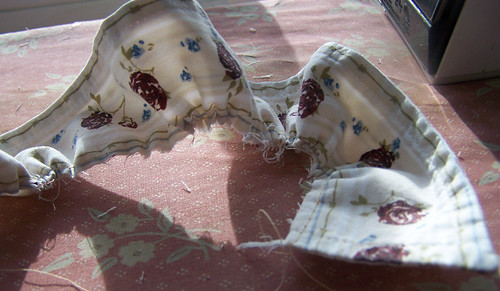 seemed a tad low cut for a 2 year old. so I took the collar I had cut off in the begining and gather stitched it
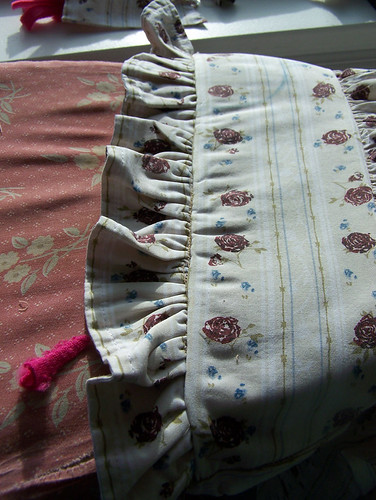 then right side to right side to right side again I sewed it on. Pressed it out.
Now this part I didn't get any pictures but I just took one of the shirt cuffs and cut in in half then hemmed it added some 1/4th inch elastic and made it gather a little I also had to add two buttons one to the top and one to where I put the elastic.
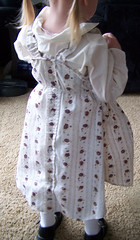
Here is what the back looks like.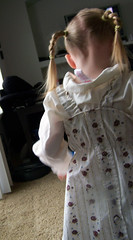
20% off pet costumes with code PETCOSTUMES
Thursday, January 3, 2008
New shirt dress
I again started with a mens shirt but this time I didn't really use the tutorial.
Little girls dresses are the easiest things on the face of the planet to make.


 For this one I did a LOT of de-constructing of the shirt. I really should do a tutorial on how to do it. Maybe I will if enough people ask for it.
I did the top part like the old tutorial said to do it. but then I (because i had a mens xxl) took a HUGE bit of the shirt and did the gathering. to make the back I did it like this Tutorial says to do but I added a elastic to the part where the top meets the bottom so the back gathered a little like the front does and for a better fit. I used my serger to do the hem and I again used the cuffs for the straps but I lost one of the cuffs so I had to cut one cuff in half. I then sewed some 1/4 inch elastic into the strap so it had some stretch and gather.
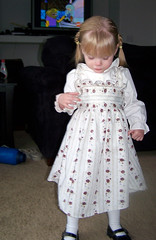
There it is with the shirt I bought to go with it.
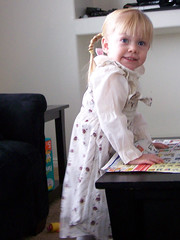
She was so excited while i was making it she called it her princess dress.
Wednesday, January 2, 2008
I have been working on some cute stuff.
will post pictures of the finished project after I finish it. Its been taking me a while but its worth the time.
some of my best work.
Monday, December 31, 2007
more links!
 | Charm Pack Squares Skirt Now you have a great excuse to use up all of your small pieces of favorite fabrics. Linda has a “charming” Charm Pack Squares Skirt Tutorial for you. Linda lives in Minnesota and has been blogging for just under a year. . her clothes are featured on her website, The Merry Church Mouse, and Etsy shop. |
 | Pillowcase Dress Jen, of Red Instead, just recently updated her popular Pillowcase Dress Tutorial with new photos and easier instructions. She writes, “I’m a stay at home mum in Australia who loves to make things and try to sell them!” this is a popular one. I hope you all find it useful |
 | Tiered Skirt Korallin share the Tiered Skirt Tutorial on her site, Kuky Ideas. |
 | Twirly Skirt Erin does it again with an easy Twirly Skirt Tutorial. It’s a proven pattern, with results enjoyed by kids and adults alike (Erin’s twirly skirt pattern pops up all over!). Visit house on hill road and thank Erin for the sewing fun! |
 | Twirly Skirt Angela created this Twirly Skirt Tutorial after making twirly skirts for her daughters (this photo shows her favorite skirt set). See more on Angela’s blog, Dangit Ange!, and her website, Cornpatch Creations. |
 | Superhero Cape Georgia from Puking Pastilles created this Superhero Cape Tutorial with girl and boy-friendly versions (her daughter’s has a princess crown on one side and a Supergirl symbol on the other, in pink and purple). There are super-clear instructions and links for great appliqués; just what your resident Superhero requires. . |
 | Pillowcase Dress Nonie’s Everything Sewing blog really does have a bit of everything, from smocking tips to a great forum. Enjoy the site’s Pillowcase Dress Tutorial contributed by Beachie (with a PDF pattern file) and then browse around! |
 | Drop Waist Twirl Skirt Hope's Drop Waist Twirl Skirt Tutorial was mentioned many people as a clear, easy-to-follow skirt tutorial. Visit Hope’s blog, Going Sew Crazy, for more! |
 | T-Shirt Dress Angela was inspired by an idea in this book to use inexpensive t-shirts for dresses for her daughter. Enjoy her T-Shirt Dress Tutorial on her blog, Quilting in Cornfields. |
 | Smocket Alicia’s Smocket Tutorial (click, then look for the right sidebar link) is such a classic, sweet design for the little girls in your life (a smock with a pocket!). Amy from happythings shared a vintage design with Alicia. Alicia then adapted it and turned it into a PDF with simple directions. Visit Alicia’s beautiful blog, Mayfly, for much more. |
Sunday, December 30, 2007
Sugar cookies I made
 Serves/Makes: 66
Ingredients:
1 cup sugar
1 cup butter -- softened
3 ounces cream cheese -- softened
1/2 teaspoon salt
1/2 teaspoon almond extract
1/2 teaspoon vanilla extract
1 egg yolk
2 1/4 cups all-purpose flour
Directions:
In a large bowl combine the sugar, butter or margarine, cream cheese, salt, almond extract, vanilla and egg yolk. Blend well. Stir in the flour and mix until well blended. Chill the dough overnight. This is very important the dough is too sticky to roll out unless well chilled. Preheat oven to 375 degrees F. On a lightly floured surface roll out the dough 1/3 at a time to 1/8 inch thickness, refrigerating remaining dough until ready for it. Cut into desired shapes with lightly floured cookie cutters. Place 1 inch apart on ungreased cookie sheets. Leave cookies plain for frosting or brush with slightly beaten egg white and sprinkle with candy sprinkles or colored sugar. Bake at 375 degrees F for 7 to 10 minutes or until light and golden brown. Cool cookies completely before frosting.

